Beyond Static Data: An Introduction to Recurrent Neural Networks (RNNs).

So far, we’ve explored feed-forward neural networks, where data flows in one direction: from input to output. This is perfect for tasks like image classification, where the entire input is processed at once. But what about sequential data, like text or time series?
When we humans read, we don’t process a whole book in one go. We read word by word, and our understanding of the current word is shaped by the ones that came before it. Recurrent Neural Networks (RNNs) are designed to mimic this exact process.
An RNN contains a “loop,” allowing it to maintain an internal memory of what it has seen. It processes a sequence one element at a time, using its memory of past elements to inform its understanding of the current one. This makes it incredibly powerful for tasks involving language and sequences.
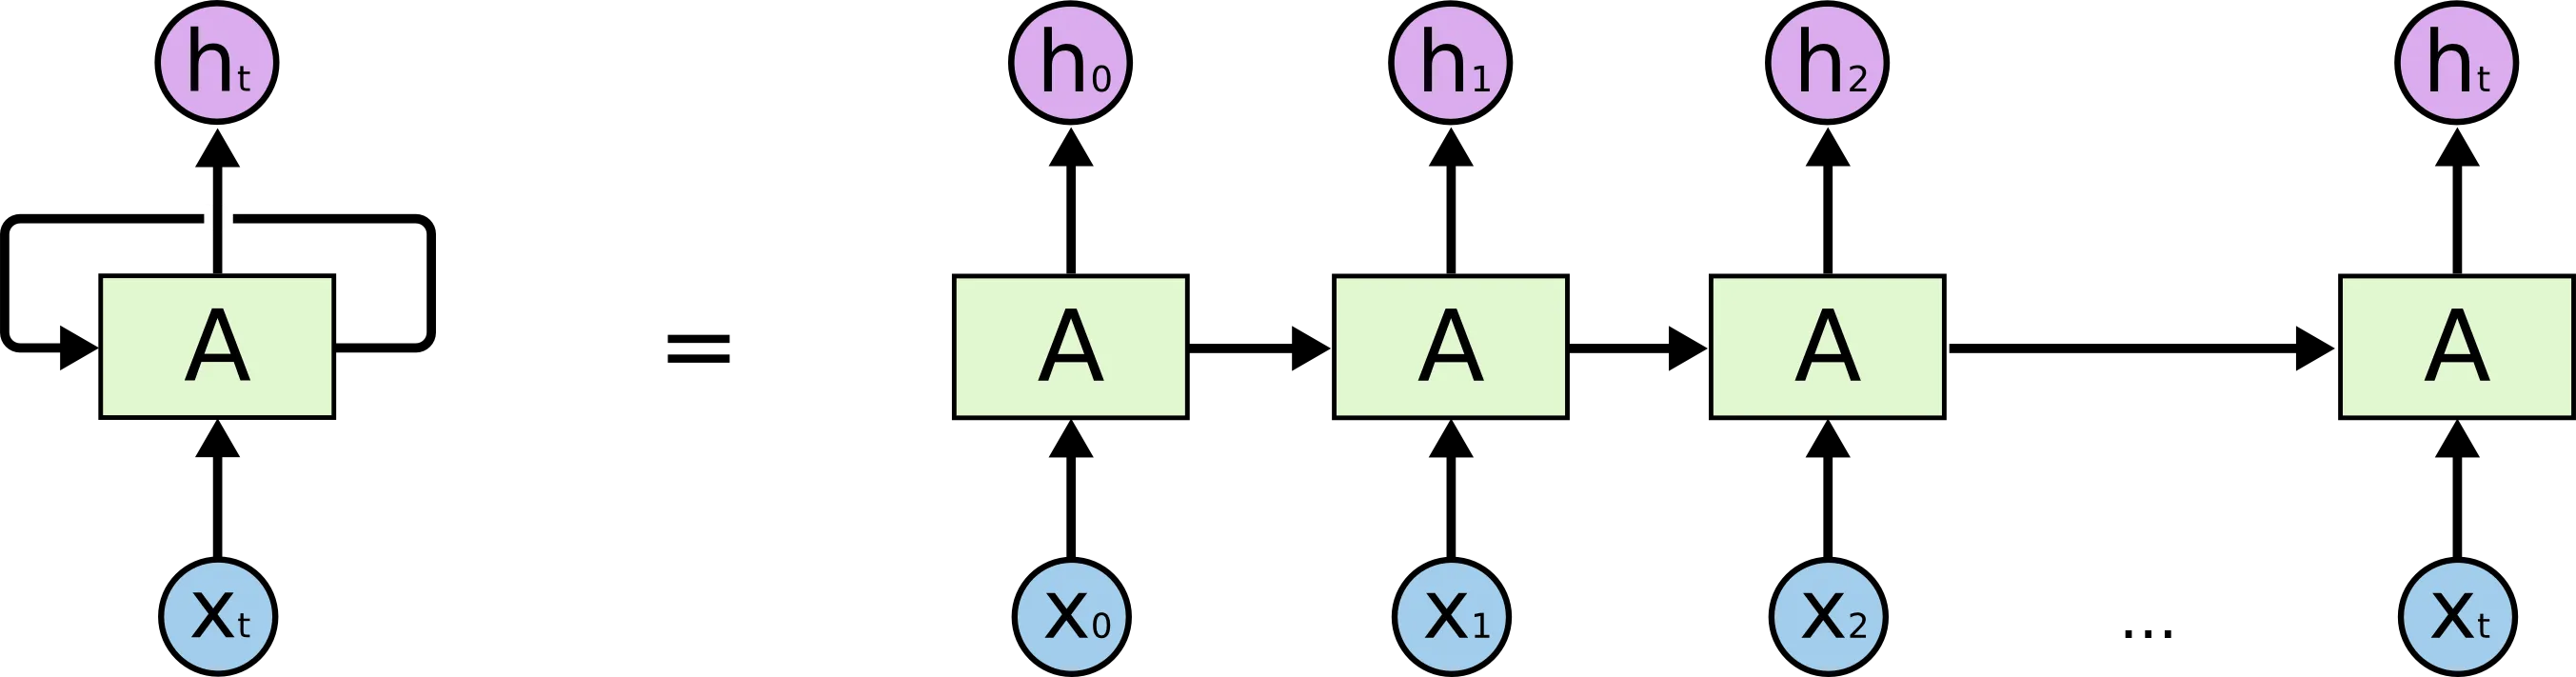
As the diagram shows, the output at any given time (ht) is a function of both the current input (xt) and the output from the previous step. The network slowly builds a richer understanding as it moves through the sequence.
A Better Memory: LSTM
The simple RNN we just described is great, but it has a short-term memory problem. As sequences get longer, information from early on can fade away. To solve this, a more advanced layer called LSTM (Long Short-Term Memory) was developed. An LSTM works similarly but includes an explicit memory mechanism that allows it to remember or forget information over long periods, making it much more effective for complex language tasks.
Hands-On Project: A Shakespearean Play Generator 🎭
Theory is great, but let’s build something fun! We’re going to create a character-level RNN that learns the style of William Shakespeare and can generate new text that mimics his writing.
Step 1: The Dataset
For this project, we don’t need a huge, structured dataset. We just need one long piece of text to learn from. We’ll use a compilation of Shakespeare’s works, which we can easily download.
import tensorflow as tf
import numpy as np
import os

# Download the Shakespeare dataset
path_to_file = tf.keras.utils.get_file('shakespeare.txt', 'https://storage.googleapis.com/download.tensorflow.org/data/shakespeare.txt')

# Read the text
text = open(path_to_file, 'rb').read().decode(encoding='utf-8')
print(f'Length of text: {len(text)} characters')
print("\n--- First 250 characters ---")
print(text[:250])
Output:
Length of text: 1115394 characters
--- First 250 characters ---
First Citizen:
Before we proceed any further, hear me speak.
All:
Speak, speak.
First Citizen:
You are all resolved rather to die than to famish?
All:
Resolved. resolved.
First Citizen:
First, you know Caius Marcius is chief enemy to the people.Step 2: Vectorizing the Text (Encoding)
A neural network can’t understand letters; it only understands numbers. So, our next step is to convert our text into a numerical representation. We’ll create a mapping where every unique character in the text corresponds to a unique integer.
# Get all unique characters in the text
vocab = sorted(set(text))

# Create a mapping from character to index (char2idx) and index to character (idx2char)
char2idx = {u:i for i, u in enumerate(vocab)}
idx2char = np.array(vocab)

# Convert the entire text to integers
text_as_int = np.array([char2idx[c] for c in text])
Step 3: Creating Training Examples
Our model’s goal is to predict the next character in a sequence. To teach it, we need to create input/output pairs from our text. For example, if our input sequence is “Hell”, the target output sequence should be “ello”.
We’ll slide a window across our text to create these sequences.
seq_length = 100 # The length of our input sequences

# Create training examples/targets
char_dataset = tf.data.Dataset.from_tensor_slices(text_as_int)
sequences = char_dataset.batch(seq_length + 1, drop_remainder=True)

# Function to create input/target pairs
def split_input_target(chunk):
    input_text = chunk[:-1]
    target_text = chunk[1:]
    return input_text, target_text

dataset = sequences.map(split_input_target)

# Create batches of training data
BATCH_SIZE = 64
BUFFER_SIZE = 10000 # For shuffling
data = dataset.shuffle(BUFFER_SIZE).batch(BATCH_SIZE, drop_remainder=True)
Step 4: Building the Model 🧠
Now, let’s design our RNN. Our model will have three layers:
- Embedding Layer: This is an input layer that turns each character’s integer index into a dense vector, allowing the model to learn relationships between characters.
- LSTM Layer: The core of our model. This recurrent layer will process the sequence of character vectors and learn the patterns of Shakespearean English.
- Dense Layer: The output layer. It has a neuron for every character in our vocabulary and will produce a probability distribution for the next character.
VOCAB_SIZE = len(vocab)
EMBEDDING_DIM = 256
RNN_UNITS = 1024

def build_model(vocab_size, embedding_dim, rnn_units, batch_size):
  model = tf.keras.Sequential([
    tf.keras.layers.Embedding(vocab_size, embedding_dim),
    tf.keras.layers.LSTM(rnn_units,
                         return_sequences=True,
                         stateful=True,
                         recurrent_initializer='glorot_uniform'),
    tf.keras.layers.Dense(vocab_size)
  ])
  return model

model = build_model(VOCAB_SIZE, EMBEDDING_DIM, RNN_UNITS, BATCH_SIZE)
Step 5: Training the Model
We need to compile our model with a loss function and an optimizer. We’ll also set up checkpoints to save our model’s progress during training, which is a best practice for long training jobs.
# Define the loss function
def loss(labels, logits):
  return tf.keras.losses.sparse_categorical_crossentropy(labels, logits, from_logits=True)

model.compile(optimizer='adam', loss=loss)

# Directory where the checkpoints will be saved
checkpoint_dir = '/content/training_checkpoints'
checkpoint_prefix = os.path.join(checkpoint_dir, "ckpt_{epoch}.weights.h5")

checkpoint_callback = tf.keras.callbacks.ModelCheckpoint(
    filepath=checkpoint_prefix,
    save_weights_only=True)

# Let's start training!
history = model.fit(data, epochs=50, callbacks=[checkpoint_callback])
Step 6: Generating New Text! ✍️
Once training is complete, the real fun begins. We’ll load our trained model’s weights and use it to generate new text. We need to rebuild the model with a batch_size of 1, as we’ll now be feeding it one sequence at a time.
The generate_text function below works by:
- Taking a starting string (our “seed”).
- Feeding it to the model to predict the next character.
- Taking that predicted character and adding it to the input for the next prediction.
- Repeating this process to generate a full block of text!
# Rebuild the model with a batch size of 1
model = build_model(VOCAB_SIZE, EMBEDDING_DIM, RNN_UNITS, batch_size=1)
model.build(tf.TensorShape([1, None]))

# Load the weights from the latest checkpoint
# Manually find the latest checkpoint file
checkpoints = [f for f in os.listdir(checkpoint_dir) if f.endswith('.weights.h5')]
latest_checkpoint = None
if checkpoints:
    # Sort checkpoints by epoch number (assuming the format ckpt_{epoch}.weights.h5)
    checkpoints.sort(key=lambda x: int(x.split('_')[1].split('.')[0]))
    latest_checkpoint = os.path.join(checkpoint_dir, checkpoints[-1])

if latest_checkpoint:
    model.load_weights(latest_checkpoint)
    # Build the model after loading weights if necessary, but before generating
    # Since we rebuilt with batch_size=1, it should be built, but this is safer
    model.build(tf.TensorShape([1, None]))


    def generate_text(model, start_string):
        num_generate = 800
        input_eval = [char2idx[s] for s in start_string]
        input_eval = tf.expand_dims(input_eval, 0)
        text_generated = []
        temperature = 1.0 # Higher values mean more surprising text

        # Reset the states of the LSTM layer
        model.layers[1].reset_states()

        for i in range(num_generate):
            predictions = model(input_eval)
            predictions = tf.squeeze(predictions, 0)
            predictions = predictions / temperature
            predicted_id = tf.random.categorical(predictions, num_samples=1)[-1,0].numpy()
            input_eval = tf.expand_dims([predicted_id], 0)
            text_generated.append(idx2char[predicted_id])

        return (start_string + ''.join(text_generated))

    # Get a seed string and generate some text!
    inp = input("Type a starting string: ")
    print(generate_text(model, inp))
else:
    print("No checkpoint files found in the directory.")
And there you have it! You’ve successfully built a creative AI that can write in the style of Shakespeare. Try different starting strings and experiment with the temperature parameter to see what you can create.